Marionette Show: Covering Everything In Velvet

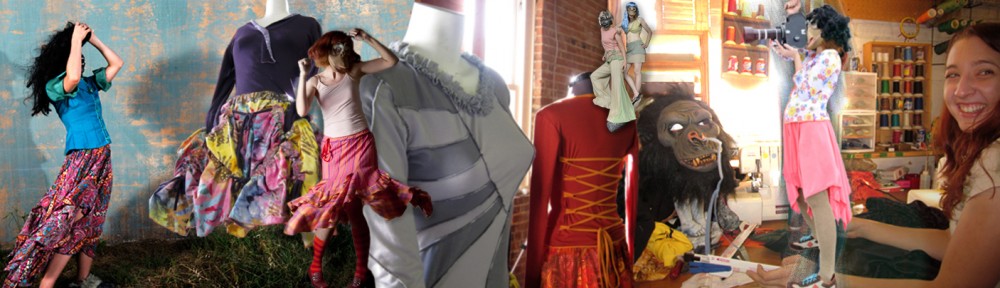
The Project: Cover everything that isn’t part of the visual magic in black velvet for the Fair Park marionette show Captain Kid’s Theater


Several curtains, 3 scaffolds, and up to 10 marioneteer costumes had to be covered in black velvet so that they would all blend together in dim lighting. The thing about sewing velvet together to make it invisible, though, is that the seams would catch light. So seams had to be minimized.

I moved all the seams on the shirt and pants to the back. Starting with a commercial pattern for a loose tunic, I cut up the original pattern and taped the pieces together in a different order.

Then tested my idea out on some crappy fabric that had gotten a burn down the center seam:

It worked out great, so I made a second prototype out of velvet. Which was unfortunately narrower than my first test fabric, so I had to add a panel for width in the back:

Then I took the sleeves down a bit to be able to squeeze them in tighter on the narrow fabric. I was still annoyed by the wasted fabric triangle between them, but later realized that the pants, wide as they were, were not wide enough to go around the slippers they were to be sewn to. Adding a triangle godet on the back seam saved them.

They were intended to be one-size-fits-all for people up to a relatively tall/large male, so I tested the first outfit on a large male:

The sleeve cuffs and bottom of the shirt were hand sewn with a blind hem stitch so there wouldn’t be any visible seams.

The nap of this velvet is very subtle. While most velvet seems to be detectable up and down, I could only detect this one side-to-side, and each time I checked the direction, it took several pets before it was apparent. If I had sewn anything upside-down, however, it would have been very apparent:

The outfits wouldn’t be complete without hoods with dark eye cutouts:

The hoods also needed a blind hem around the bottom edge.

And finally, finished outfit, attached slippers and all. I added an elastic finger loop so the marioneteers could raise their hands without their sleeves sliding down.

Without the hood, it’s a pretty sharp outfit for the hip man-about-town:

Or maybe for the man-about-town who wants to get a hip replacement after he gets hit by a car for walking around in this at night.

I added numbered labels so that no one would have to share hoods and breathe in each others’ velvet.

Anything that had any size differences was mentioned on the label:

So much for the costumes. On to the side tent drapes.

These are 14 feet long, get attached to the sloping ceiling, and have to have invisible seams.

This was another project for the Atrium. I stair-stepped the panels, sewed a couple panels of the backing fabric together first, then attached each panel of velvet one by one. The velvet panels would get spread out flat, pinned in place, stitched to the lining, taken back to the Atrium and pinned with a little fold over the seam. Every time the narrower velvet panels caught up to the width of the backing fabric, I added another panel.

Then the folds were hand-sewn in place.

Repeat this multi-step process for each seam, upstairs, downstairs, one shoe off and one sock on. Or 2 socks and 1 butterfly.

And then:

I made an angle template using the height to the point and the length. That is: a-squared + b-squared = c-squared.


I also made a couple large screens that could be transported around the stage to cover anything that needed covering as other objects were moved.

A last-minute realization that a giant triangle needed to come down from the peak and stretch to the side curtains gave me a couple days to get it done. Of course, this also coincided with my phone’s battery, and thus camera, going on the fritz, so no pictures of the 20′ triangle. .

Covered buttons and fabric strips to be used as handles on some foam items that were covered in velvet:

The other big velvet-covering things were 3 scaffolds. I was also going to cover some outriggers (feet) that would project out the front. The side slits were designed with those in mind, but were rendered pointless once the decision was made to keep all the outriggers on the back and leave the front flat.

This part of the project took some planning:

After most of the sewing was done on them at my studio, it also took about 8 hours to install on location.


I couldn’t really get any good shots showing the individual black-velvet-covered items or curtains, which was kind of the point:

A couple entrance/exits were added to the side curtains after they had been hung. Since they couldn’t be taken down, they had to be pinned then cut while hanging from the ceiling. I balanced my serger on the top ledge of a 5-foot ladder and put the foot pedal on the platform below. I also got to do some no-taking-down-the-curtains sewing on top of the scaffolds. Unfortunately, I couldn’t take a picture of any of this, as my camera had started working again after last time, then went on the fritz for most of my on-location sewing.

Anyway, the door that is hidden by the pirate ship in this picture had to have a flap put over it so it would remain invisible when the ship moved, so I made a panel with the seams wrapped around to the back and hand-sewed it to the top by the ceiling.

You can see, just to the right of that bunch of palm trees the edge of the side curtain. To the right of that are the scaffolds, creating an effect like that secret wall in the Labyrinth.

You have to listen to the worm–

Emergency Curtains

The Project: shorten 8 curtains by 1 inch and add pleats for a D Magazine photoshoot the next day


The easiest way to quickly shorten it was to fold the top down. It also had come with some tabs, but as they were going to be hung with clips on rings, I pulled all those off.

I finally obtained a replacement bulb for the impossible-to-find Janome 3022, and simultaneously learned what the “Plus” means in “Batteries, Plus.” It means light bulbs. It would probably be less confusing for everybody and generate a lot more sales if they would just change their name to “Batteries and Light Bulbs.”

I was pretty excited to be able to see what I was doing on this project without having to angle a lamp in, and The Princess was excited to be able to advertise again. Now you can tell it’s a Janome without prior knowledge.

I realized that I am not willing to postpone making an ironing table any longer. The very next day I ran out and bought the materials needed to turn a hollow door into a giant ironing board, despite the lack of a sale or coupons.

Of course, then another emergency sewing project came up and now the materials are sitting on my work table waiting to be stapled together.

New Wardrobe

I have a client I’ve been sewing for for years who only wears floor-length skirts, and they have to be busy. She is the kind of person who can take a clown costume and make it look subtle and elegant, so she recently started going through her wardrobe and updating everything that wasn’t interesting her anymore.

Before:

After:

Before:

Middle:

After:

After, other side:

I also made several originals in various color combinations in her current favorite design:

And one shirt:


Two of these garments are pictured with a backdrop of my wall hanging of the petroglyph of Powerful Woman by Ty Albright, commissioned to replace the door to my laundry room with something more interesting.

Catching up on the Little Things

So I’ve been busy sewing instead of blogging, and it’s not going to get any better for my blog for another two weeks, but while I’m still too awake to sleep and too tired to sew, I’ll catch up on everything but the big project that’s taking all my time right now.

That one doesn’t get any updates until after it’s finished and open to the public; the press event is on the 3rd of next month, so by force everything we’ve been working on will have to be done by then or else. And I’ll finally be able to catch up on the other clients I’ve been juggling on back burners, as well as probably start an etsy store. Or, because there’s not much I hate more than listing keywords and filling in forms, get my roommate to start an etsy store for me in exchange for various goods and services, including turning all this accumulation of grey into a decked out bedroom lounge area:


Here are a few of my recent smaller projects . . .

A customer wanted to buy these earrings, but I had lost one, so I copied the earring I had to make a complete pair:

I did a handful of minor alterations, including adding a snap to make this vest into a shirt:

Which means that I got to have a hand in reimagining a garment by my favorite designer:

I took this complicated dress in by about 4 inches in the sides (which included a zipper and multiple seams) and the shoulders:

It was a very hot little number, but I don’t have a mannequin or dress form with small enough shoulders to give a full visual image of how tailored this dress is.

I turned these fabrics:

into these 2 shirts, 1 dress, and repair of damage to the original:

I took this bridesmaid dress in in the front so the boobs didn’t pouch out, then let the back out by 4.5 inches using some of the lining fabric:

I was invited to the upcoming bridesmaid-dress-burning party, as well as got to meet this odd, hooded cat who has a beard and socks:

This picture doesn’t do his surreality justice.

I made a number of garments for the local boutique and will try to make more in time for their trunk show later this month:

While replacing the buttons on this dress, I discovered some further damage:

Repaired:

Sweater holes–

before:

after:

closeup:

There are 3 repaired holes in this shot, if you can find them. Otherwise, there are none:

And to replace some worn-out elastic in a casing that is too small for a bodkin, I stitched the elastic to this tool. It would have fit through the eye, but that made it too bulky to fit through the casing:

White Flurries

I’ve been doing alterations as well as sewing new garments for a nearby clothing boutique. They’ve got another artist who art-dyes fabric and who is starting a round of dying fabric and garments for them, so I was commissioned to make as many white dresses and tops as I could as fast as I could.

I did them like a mini production line, cutting things out for as long as I could stand, then dividing them up into piles that needed the same next step:

One of the designs calls for bias binding using very lightweight gauze, which I discovered cannot really be done without some heavy pinning.

Here is the first round, all stacked up neatly:

Velcro

Next round of velcro-on-Cartier-panels. This set is 330+ panels, so the new machine is pretty much broken in as far as sewing through glue.

I’ve been thinking about a name for the machine: perhaps a superhero, to go along with Jonah Hex, my serger. I considered The Flash, but I don’t think it would be readily clear that I’m referring to Wally, who dresses in red and wears a lightning bolt, rather than just something that is fast, without having to stop and explain to everyone:

Me: This sewing machine is called The Flash.

Other Person: Oh, because it’s fast.

Me: No, because it’s super.

Other Person: Oh, right.

I’m not sure that any other fast superhero has any clearer a name in regards to sewing machine nomenclature, so then I thought about naming it after the fact that it only does one thing, but it does it really well.

The Atom? But he’s also smart, and I don’t know how bright this machine is, after all. Elastic Man? That’s a big misleading.

The Green Lantern is definitely the one-trick pony of the Justice League; magic ring, and all he ever manages to imagine with it is a giant fist. I suppose he can also cut things when necessary, and that he can change his foot pressure.

If anyone confuses the name Green Lantern–

Other Person: Oh, like a decorative green lantern I would put in a yard or buy at Hobby Lobby in the perpetually half-off glass section?

–that’s their own fault, and I’m not explaining it. Though perhaps I should ask Larry what he thinks of the name before I christen it with a bottle of machine oil, as it is his sewing machine after all.

Wonder Woman is not amused. (Actually, this isn’t the Green Lantern I picture in my head, but I couldn’t find any handy shots of Jon Stewart making a fist, for some reason.)

Anyway, back to how Green Lantern handled the glue. Pretty well; the needle continues to not be particularly gummy. The bobbin case is only marginally sticky and it catches a very moderate amount of fuzz. The thread has a periodic tendency to break, and there seems to be some sort of intermittent issue with the tension, but complaining about that after getting 250 strips of sticky-back velcro into this project is pretty much complaining that my sewing machine isn’t magical.

And now I’ve created this horrible meme that will live forever on the internet.

Chinese New Year Sacks

Usually for these panels, I just stitch on the velcro, then someone else glues the fabric to the backing. This taffeta fabric chosen to decorate for the Chinese New Year was too thin and the glue left visible dark spots. So instead of wrapping the fabric around the styrene, we made the panels like bags with the styrene as an insert.

I laid the styrene panel on top of the fabric and traced around it, then stitched on the outside of the line with the fabulous new Speed Janome. (I need to come up with a better name for it–and don’t say it already has one. I don’t tell you to name your kids Tiny Human Jones; don’t tell me to call my sewing machine P1200.)

Snip the corners, turn it right side out, and poke the corners out with this corner-poking tool:

Press the pouch. Before:

After:

Eek, I ironed off the velcro! No, it’s on the other side. I had you for a minute there, didn’t I.

Don’t worry; I’m not going to justify that “question” with a question mark.

Double-sided tape to hold the velcro in place and pull the back fabric taut:

I cut the raw edges fairly close, then folded them inside and pinned:

Larry made an extended table for the sewing machine, which was necessary for sewing something this stiff that had to be kept flat.

Here is a shot of it being slightly more visible:

I broke into the Chinese New Year panels for some emergency velcro-sewing on some regular panels. There is a gap between the back of the sewing machine bed and the extension because the base didn’t take into account the width of the knee foot-raising lever.

Which I also had a hard time remembering to take into account. The first several panels, I snipped the threads with a physical scissors instead of the auto-snip scissors button. Since I associate my hand (upper body) with raising the presser foot and my foot (lower body) with making the machine run, trying to associate my knee (lower body) with raising the foot kept messing up my internal autopilot; I kept mixing up making the machine go with the knee-raiser and pushing the pedal with raising the presser foot. Other times, I would raise the foot by hand and by knee at the same time or confuse the fact that the knee raises the foot temporarily while the hand lever raises it until you manually lower it.

We needed a couple dozen velcro strips, which wouldn’t truly test the new machine’s ability to handle the X-treme glue (no sic), but it could start to give an idea, as well as mentally prepare Speedy for his real full-time job that does not include hours of sewing on luxurious taffeta.

Here is what the glue looks like collected on the needle:

That’s the accumulation from just one strip.

So far it does not seem to be getting down into the bobbin case or sticking to the bottom of the presser foot. Or getting into the feed dogs or lining the bottom of the needle plate.

These needles don’t really have much of an indent running down the shank, so the glue doesn’t build up in there. The side-loading needle so far seems to handle the glue and keep the thread away from it better than the usual front-loading needle.

One sort of problem I’ve noticed with this machine is its ability to corner:

And again, to show that this is not an isolated incident:

Though in this one, you can see where it’s trying.

Coming up slowly on the corners–and of course coming to a complete stop, raising the presser foot, then turning the fabric–does not seem to have any effect on its tendency to Tokyo drift.

Anyway, back to the New Year panels:

Because the process involves so many steps, and because doing all of one step before moving on to do all of the next step takes less time than cycling through all steps for one or for a small group, I tried to production-line as many stores at once as I could. They’re all divided up by very specific quantities and sizes–down to a half-inch difference between the panels for one store or another. So here is the mess of multiple stages going on and being kept carefully separate.